So, as part of the shed building process the first step was in getting a slab prepared and laid. The concreter, Darren that our shed company had organised us did a great job at preparing the site and was careful around all the irrigation pipes and pool pipies that came pretty close to the slab.

By the time it came to the pouring day temperatures were beautiful – a pleasant 25 degrees each day. Very pleasant but the winds were a bit high – Which meant unfortunately the slab started to dry a bit to quickly by the time the slab had been completed and had started the curing process.
I called the concreter in the afternoon after realising it had started to crack. He said he would be around soon to cover the slab with a tarp and water it down. He came around and wet it down and tarped it. Thankfully, this prevented further hairline cracks from forming.

After discussing the cracking with knowledgeable persons within building industry I learned it’s a pretty common occurrence – even in new slabs. Whether it could have had water put down on it earlier or not it could have prevented them from forming – But, to be honest, they were only small cracks.
On talking with the concreter after he came to remove his form-work, it’s thought the cracking was the result of win drying the top to fast. Which is the most likely case, it was a windy day.
So, that started the conversation with Darren on what can we do to help the slab look new. Darren recommended sealing the slab with an acrylic/oil-based sealant.
So, after agreeing he would repair the cracks on the slab, I would then pay him for some sealant, that I would later apply.
So, on the weekend, I finally got around to sealing the slab after the shed was all but nearly finished – Currently, just a few minor things need to be repaired before the building inspector will sign-off on it. So, as all the major works have been completed, I sealed the slab over the weekend.
The learning process
So, I read the instructions on the side of the sealer, a sealer by Concrete Colour Systems. It recommended a well cleaned slab – I used my Gerni for this. Though, if you have an existing slab you’ll want to complete further cleaning then just a pressure sprayer as you may have oil or grease marks that’ll require the appropriate chemicals/soaps to clean the surface.


If you have the option, give it an acid wash with Hyrdochloric acid, as this will help to remove and allow the sealer to bond with the pores of the concrete. Then water the slab down well to neutralise the PH of the cement.
The application process was rather straight forward, first coat water the sealant down with some solvent – For a 6 x 4 shed slab it was about 4 litres for the first coat with a mixture of solvent (10%). The second coat was just re-applying the sealant in it’s full strength. I used a further 5 litres for the second coat.
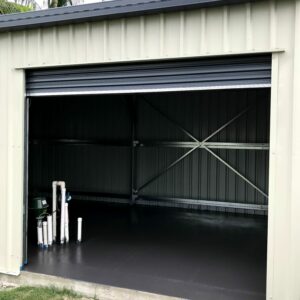
So, what’s the end product, well I added a sealant tint – Storm Grey – Basically a dark gray colour – must like the colour of freshly poured conrete. What’s it feat like under the feet – Quite nice, it feels like a lino surface and smoothed out the broom finish – So much so, you hardly notice the broom finish – I’m yet to test the floors after it’s been wet – But, from the small amounts of water I’ve had on the slab since sealing it – It’s pretty grippy on a broomed – finished slab.
Tips:
- Prepare all your painting products and buy a quality roller with an extension arm.
- Wear some old socks instead of shoes.
- Apply the second coat at a right angle to the first.
- Complete the sealing on a pleasant day – 60% – 70 humidity and a temperature of about 26-28 degrees. High humidity can be problematic with causing bubbling within the sealant as it’s drying.
The finished product with the added 2 Litre Storm Grey Tint.


You must be logged in to post a comment.