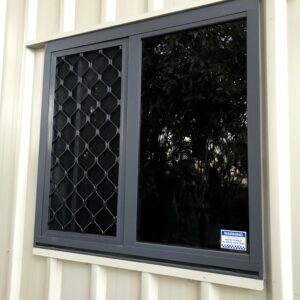
The other week the security screen arrived for the shed window. So, while installing it I thought I might put the extra effort in and also install some tinting to help control the temperature.
The budget for this project was $50.
As I’m new to tinting I of course watched many YouTube video detailing the process. I determined after watching that yes of course, I’ll need a squeegee, a soapy water solution and a blade.
So, as you can see from the above video, it’s possible to do if you haven’t done it before and as it’s a shed, I knew I wouldn’t mind if there was a minor imperfection in my tinting application.
The tinting I got was 20VTL (Dark Smoke) that I purchased from Supercheap Auto on Special for about $40.

I purchased the spray bottle and squeegee from Woolworths.
The process.
So, the tinting is 3m x 50cm which was plenty for my window which was about 30cm wide for each panel by about 50cm tall. I of course failed with my first cut of tint before even applying it as I made the mistake of not spraying the tint enough – so, it stuck to itself like a huge piece of tape. Not a pretty site.
I didn’t mind failing on my first go, as I still had another 2m to go.
My go at applying the tint – it went down alright – but I removed the tint thinking I had sprayed too much solution – As the tint just kept sliding – Stupidly it would have actually been okay – I just needed to cut it and keep pushing the solution out.
Anyhow, by this point in time – I was down to my last 2 piece of tint. Which I successfully managed to apply with minimal errors in the application.
The end result is below – But, it was well worth-it compared with getting a professional out to do it at the cost of approximately $200.
Before.

The finished product.


You must be logged in to post a comment.